|
A beginners guide to Vaping
Atomizers, Cartomizers and Tanks 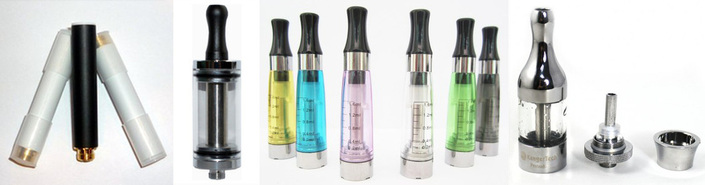
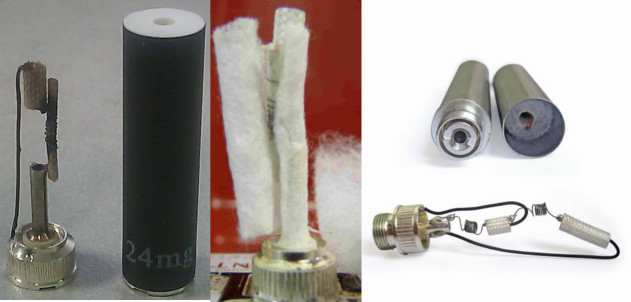
These are the parts that hold the fluid and atomize it. They screw onto your device which is basically just a power source and a switch. In the beginning we basically had a small atomizer with a tip that held a small amount of fluid in it.
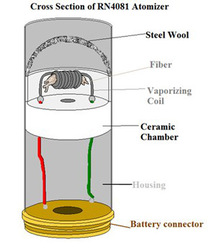
Above we can see some tips or cartridges with an atomizer. To the right we can see a diagram of a basic atomizer. As we can see it is a connection, some none resistant wires, a coil of resistant wire (heating element or heating coil), a wick and some steel wool type of material for a cover and to help wick the fluid to the coil. With these atomizers you can either use a cartridge that holds the fluid, or you can drip directly into the atomizer. This is what we call "dripping", I do not suggest the beginning vaper tries dripping. It takes some practice to get right.
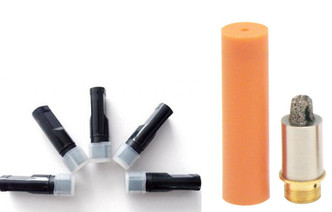
Carotmizers 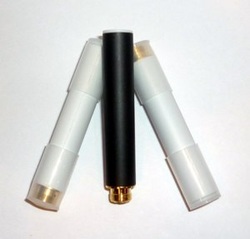
Next we progressed into what is called a Cartomizer. To the left you can see a basic cartomizer. As you can tell by the name and the pictures below this is basically the atomizer and cartridge combined into one unit. As the picture below shows it is comprised of a heating coil, a wick and filling material that holds the fluid. There is also an insulating sheath to help keep the filler material from burning. Think of it as a cigarette butt with a heating coil in it. As the coil heats up it atomizes the fluid inside the poly fill material. Cartomizers are still very popular and many still use them even on larger devices. These are the norm for pretty much all the stick sized E cigs and disposables. Except with the disposables the cartomizer is not a separate part you can unscrew, they are all one piece designs. Cartomizers are commonly called "Carto's" and come in different sizes and different threading on the connection depending on the device they attach to.
Cartomizer Tanks 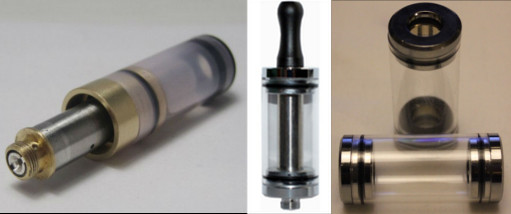
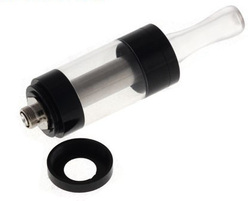
Since cartomizers really don't hold that much fluid someone came up with the idea to build a tank around it. ( We now have fairly large cartos though that will hold quite a bit of liquid.) Above you can see a few examples of cartomizer tanks. This is simply a flask that surrounds a cartomizer inserted through the middle of it. Since the cartomizer needs a way to pull fluid out of the tank it needs to be punched or slotted. To the right you can see a slotted cartomizer designed for a carto tank. As the fluid inside the carto gets used and the filler material dries out it absorbs and draws the fluid into cartomizer from the tank.
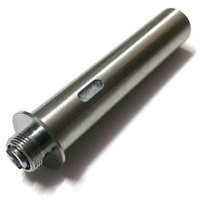
For most carto tanks you need to pull the cartomizer part way out of the tank and drip fluid down in between the carto and the inside wall of the tank in order to fill it. The upper left photo shows a carto pulled part way out. This can make it sort of messy and somewhat of pain to fill. To solve that problem some tanks come with a small hole and plug in order to fill them. The holes are pretty small though and you will either need a bottle with a needle tip or a syringe to fill it easily. There is also a tool that is a cylinder with two holes in it that you can slide into your tank. This tool will push your carto part way out and you can drip fluid into the opening of the tool to fill the tank. This helps keep the top and bottom of your tank sealed while you fill it. 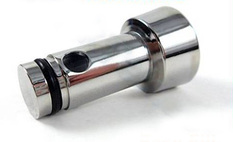
Carto tank filling tool
Another problem with carto tanks is that with many of them the tank is simply held onto the carto via O rings and a snug fit. This means that it is quite possible you can pull the tank off the carto if you handle it wrong. LIke say you have it screwed into a fairly heavy device and you try to pick it up by the tank. And as you can imagine if the tank separates from the cartomizer it makes quite the mess. So many of the newer carto tanks use a special cartomizer with a lip on the bottom that fits into a slot, then a locking ring is screwed down over it to hold it in place. This ensures the carto will not separate from the tank unless the locking ring is removed. One down side is you have to unscrew the tank from the device and remove the locking ring to fill it. Unless of course the tank has some sort of fill hole. Carto tanks are still very popular and widely used.
I personally don't care for cartomizers or carto tanks myself. I feel the cartomizers tend to mute or change the flavor of the E juice. They are also prone to dry hits, which is when the coil does not get enough fluid to vaporize and you get a burnt dry taste. Sometimes it is very harsh and nasty. I am also not a big fan of the tanks because they can come apart and or are messy and a pain to fill. Cartos can also become flooded and become gurgly if over filled or for some reason it pulls too much fluid from the tank. This is when you take a draw on the mouth piece and you get that empty cup with a straw effect. In some case you can even suck unvaporized fluid into your mouth. Not as nasty as a dry hit, but not overly pleasant either. Ego T and C style atomizer/tanks 

The Ego T and C style tanks are much like the original atomizer systems in that they use a separate atomizer with a cartridge tank that snaps on top of the atomizer. The major difference being these are designed for the larger Ego style batteries which we will discuss later in the Device section. In the above picture you can see the tank and atomizer screwed onto 650mah ego style battery.
In the middle right photo is the ego C cartridge and atomizer with no batter. The main difference between the ego C and T are that the Ego C can be broken down into 4 parts as you can see on the bottom right photo. The ego C has a separate base and atomizer, a cone that covers it and a tip that acts as a small tank. On this model when the atomizer goes bad you can simply switch out the atomizer head. On the Ego T model there are only two parts, the tank/tip and the atomizer section. On the Ego T the base, atomizer and cone are all one piece and cannot be separated. When the atomizer goes bad you replace the whole assembly. The advantage goes to the Ego C because the atomizer heads are cheaper than the Ego T combined unit. You can get about 5 ego C atomizer heads for about the price of one Ego T atomizer unit. I have an Ego T kit and am honestly not overly happy with it. The flavor was ok, but not the best, the tips really don't hold a lot of fluid and are sort of a pain to fill because the fill plug on the bottom is in there pretty tight. It was very prone to dry hits and the atomizer and cone would get very hot with extended use. If you take an occasional vape now and then and set it down it works fine. But if you chain vape it and take several hits one after another it just doesn't seem to keep up. I will say this though, the tank with an ego style battery has a very clean look to it, and this is what attracted me to it. CLEAROMIZERS 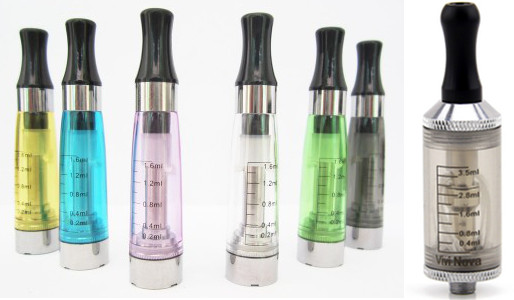

Clearomizer tanks are probably the most popular and widely used tanks we currently have. They work well, are inexpensive and fairly simple to use. And fit just about any device out there with a 510 thread (which is pretty much the standard now a days). They come in a variety of colors, sizes and styles. Some even light up if you like that kind of thing. As you can see in the picture on the left they are comprised of a tip, the tube or tank, the coil or atomizer, some wicks and the base that screws onto your device. The above picture on the left shows some basic "stardust" type tanks that are designed to fit on the Ego style batteries. They have either 510 or Ego style threading and are the same diameter as the ego batteries so they have a very nice and clean look when used with these style batteries. They will also fit most other larger devices as well, but not all. It will depend on how the connection is designed on your device. The original "stardust" tanks were a sealed unit and once they failed to work or started to taste burnt you just threw them a way. The newer ones come apart so you can clean the tanks and change out the atomizers when they go bad. Just like with the Ego C and T atomizers the sealed unit cost more than the heads by themselves. One thing to keep in mind when using these tanks is to always unscrew it from device using the base. If you turn the tank there is a chance of unscrewing the tank from the base and the fluid will dump out of the tank.
The other main style is the "vivo nova" style tanks which is the tank on the upper right. These are lot like the stardust tanks except the don't really have that cone shape to them and in most cases they hold more fluid. They also take a drip tip instead of a screw on tip which makes it nice if you want to use different tips. To fill these tanks you either unscrew the tip, or on the larger tanks the top cap unscrews. Then you drip fluid into the top of the tank. Be careful not get fluid in the center hole where the coils are or you will flood them out and they will be gurgly. Obviously the larger tanks are easier to fill because you have more room on the sides. These tanks work pretty well except for one problem. The wicks are not real great at wicking fluid up to the coil. Especially when they get low. So to keep from getting dry hits you need to tip the tanks on their side and or roll them around a bit to saturate the wicks again. It is something you get to used pretty quickly though and do it without even thinking about it. Just turn the device on it side and wave it around a little bit and you are good to go. This is one advantage the cartomizers have over the tanks. However the tanks tend to produce better flavor and sometimes more vapor than a carto. BOTTOM COIL TANKS 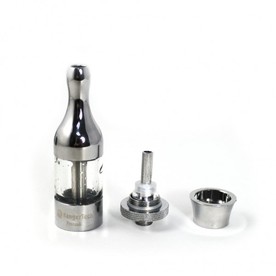
This brings us to the Bottom Coil tanks. This is one of newer designs we have and they seem to be catching on. They are much like the Clearomizer tanks above, except the atomizer head is in the bottom of the tank instead of the top. This lets it be fed by gravity and not an upward wicking action. These have replaceable coils/heads as well. When the coil quits, or gets nasty you simply unscrew the base cap, then unscrew the head from the base and put a new one in.
Filling these is slightly different though in that you have to remove the tank from the device, unscrew the base cap and fill it from the bottom instead of the top. Fill it up to edge of the shaft in the center, put the base back on and re attach it to your device. These also come in a variety of sizes, designs and colors. Even dual coil models. The one pictured to the right has an integral mouth piece but other model do have interchangeable drip tips so you can customize them. These are the tanks I personally prefer. They are easier to use for me and they produce better flavor and vapor than any of the other tanks previously mentioned. Keep in mind that is only my opinion, others do not agree. Some people really like Cartomizers. 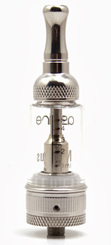
And if that isn't enough we now have a new style of tank that just hit the market. These are Bottom Coil tanks with ADJUSTABLE AIR FLOW. Yay, about time! These tanks work like the other tanks above except they have a ring on the bottom that lets you adjust the draw and amount of air flow so you can tailor it to your liking. In my opinion this is a big step up in tank design and I can't wait to try one. That pretty covers it for the basics of tanks and atomizers. I am not going to write about RDA's RBA's and dripping atomizers since I don't feel they are in the scope of a beginning vapers guide. I well briefly explain what they are though. RDA's are rebuildable atomizers used for dripping. And RBA's are rebuildable tank systems. These let you build your own coils and choose your own wicking material. These are for the more advanced vaper or hobbyist not the basic or beginner vaper. I do have an RDA though and the taste simply can't be beat. It takes some time to get them right though and you have to pay attention to what you are doing or you can ruin something.
Next up is E juice, click the button to continue. |
 |
